How to Create and Submit Your Sitemap to Google: A Step-By-Step Guide
Google recently rolled out its August 2024 Core Update. And it’s driving everyone crazy.
People (and this includes the place I work at) have been seeing a significant increase in their traffic. A lot of people have also seen their traffic go down (running theory is that this is a crackdown against AI-generated content and we all know how I feel about that). And I am happy to report that I’m one of the “small, independent” websites Google wanted to promote in this update. Check this out:

Side note: I’ve seen a similar hike around this time at work too.
Now, I haven’t done anything. This traffic has come out of nowhere. And this got me thinking: what if I actually focused on the things I’ve been neglecting on this blog, and push everything live once the update is over?
How will that affect traffic? Will I see these numbers everyday?
And that brings us to the present. Think of this as my mini series while this Google update happens.
So, without further ado (and going over the recommended 300 words mark), in this post, I’m going to provide you with a step-by-step guide on how to set up and submit a sitemap to Google.
This is something I’ve been neglecting since Day One (why? I’m lazy). In the coming days we’ll look at other technical stuff you should do to help Google’s crawlers navigate through your website efficiently.
Now, let’s begin.
What is a Sitemap & Why Should I Care About It?
Oh trust me, you need to care about your sitemap. If you’re more of a content-focused person like me, it’s super easy to completely ignore it. You could totally pawn this off to a developer, but if you’re running your own WordPress blog like I am, you’d benefit from knowing how to do this kind of stuff all by yourself.
According to sitemaps.org:
Sitemaps are an easy way for webmasters to inform search engines about pages on their sites that are available for crawling.
There are different types of sitemaps, two of them being the most common, and whichever sitemap you end up using really depends on why you’re creating a sitemap.
I know, that was a very annoying statement to make. Let me break it down for you:
Types of Sitemaps
- XML Sitemap: Extensible Markup Language sitemaps are machine-readable files that list URLs for a site along with additional metadata about each URL. They help search engines crawl your site more intelligently. They include information such as when a page was last updated, how often it changes and its importance in relevance to other pages.
- HTML Sitemap: HTML sitemaps display a hierarchical list of pages on a website. They’re intended to help both users and search engines navigate through and understand your site structure. An important difference between these and XML sitemaps is that HTML sitemaps are intended for human readers and will usually include descriptive anchor text.
- Visual Sitemap: Visual sitemaps provide a graphical representation of a website’s structure. They’re particularly useful for designers, developers, and content strategists to understand and plan site architecture. Visual sitemaps often use flowchart-like diagrams to show relationships between pages. Tools like Slickplan or Octopus.do are commonly used to create visual sitemaps.
And that’s not all. There are mobile, image, video and news sitemaps too. But don’t worry about them.
A Closer Look At XML Sitemap
The most popular type of sitemap is XML. These days, if anyone’s talking about sitemaps, they’re probably talking about XML sitemaps, unless they explicitly mention something else. So, if you’re carrying out a technical SEO audit on your website, you should definitely look at its sitemap.
Why Do You Need an XML Sitemap for Your WordPress Blog?
Sitemaps help your pages show up on search results. Without them, search engines have to rely on hyperlinks to find them, and this can often result in them being missed. If you’re a new blogger, and your site doesn’t have a lot of backlinks (which also help search engines find your website), you might miss out on some pretty decent traffic.
And what’s the point of even posting content on the internet if people can’t find it? So, don’t be lazy like me. Create a sitemap ASAP (scroll down for steps)!
Now, a lot of hosting platforms like WordPress, Wix and others already have a basic sitemap set up for you when you create a new blog. But it’s recommended that if you’re publishing content regularly, you should submit sitemaps once a month. If anything, it helps your pages rank faster on Google too. And isn’t that why you’re even doing SEO for your blog?
What Does an XML Sitemap Look Like?
This is what a sitemap looks like to search engines:

This might look like a bunch of gibberish to you, especially if you have no knowledge of coding, but there’s a method here. First up is <urlset>. This contains all the tags for each sitemap. Then you have <url> which basically contains all the tags for each individual URL, and <loc> that defines the full URL of the page. You also have <lastmod> that tells you the date when the page was last modified, <changefreq> that shows how often the page is expected to change and <priority> that indicates the page’s relative importance on a scale from 0.0 to 1.0 (optional).
Pretty cool stuff, if you’re into that. Most importantly though, this format has to be correct, or basically, you’re just putting in a lot of effort in content creation for nothing. Ranking on search engines is hard, and this is one of the sure fire ways to get our lord and saviour, Google, to notice your site. If you’re going to use a sitemap generator, your sitemap may appear like this too:

How to Find Your Blog’s Sitemap (Three Ways)
Before we move on to creating a sitemap for your blog, I think it’s a good idea to actually go in and check if you have one. As I mentioned before, if you’re using a service like WordPress, you probably already have a basic sitemap.
There are three ways to check.
1. Do A Manual Check
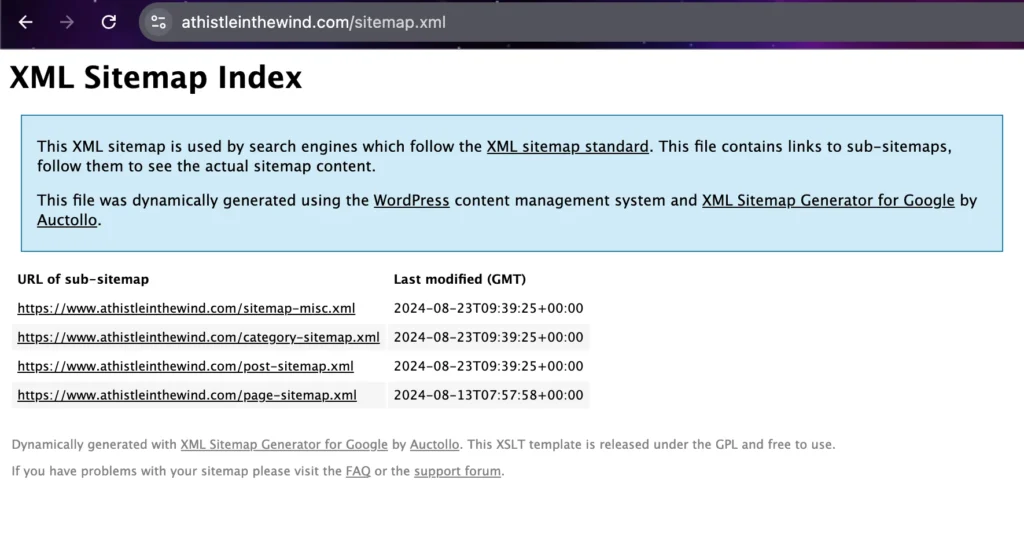
The quickest way to find your website’s sitemap is through a manual check. Simply type the following address on your browser: “https://yoursite.com/sitemap.xml,” where you should add your site’s domain name in place of “your site.” For my website, for example, I typed in “https://www.athistleinthewind.com/sitemap.xml.”
Full disclosure, this is where I realised that my website did not, in fact, have a sitemap. Why? Because in theory, I should’ve seen one of the two images I showed above. I did not. Which is bad. Don’t be like me. And yes, this is becoming a bit of a theme for this blog.
2. Use Google’s Search Operators
Basically, that point is where I went, “Nah, I can’t be that stupid.” Because I would’ve never, ever made this mistake at work. As I’ve said, sitemaps are important. And if you’re in the same place as me when I discovered that I do not have a sitemap, you’re probably going to want to be sure about it.
Which brings us to the second method: using search operators.
Again, pretty simple. All you have to do is use one of these to find your site’s sitemap:
- site:[yoursite.com] filetype:xml
- site:[yoursite.com] inurl:sitemap
- site:[yoursite.com] intitle:sitemap
Just enter this into the Google search bar, making sure that you replace [yoursite.com] with your website’s address. In my case, it turned to be as follows:
- site:athistleinthewind.com filetype:xml
- site:athistleinthewind.com inurl:sitemap
- site:athistleinthewind.com intitle:sitemap
And I got this result instead:

I tried the others too, and I did not have a sitemap. At this point, I knew I’d messed up. This is why I’ve been struggling with traffic. I did not have a sitemap. What I should’ve seen, is this:

There’s a third and final way to determine if I had really gone on without a sitemap for so long.
Side note: not sure if anyone can tell, but I’m actively writing this blog, as I figure out this entire sitemap debacle. What do you think about this? Should I write how-to’s like this more often? Let me know!
3. Use Google Search Console
If you have access to your site’s Google Search Console, you can find your sitemap submitted there.
If you don’t have a Google Search Console, you can get started here. It’s a really simple process. I’m going to cover it in a blog about Google Analytics that I plan on writing some time later this month. I’ll touch base on GSC there too since I think these two tools go hand in hand.
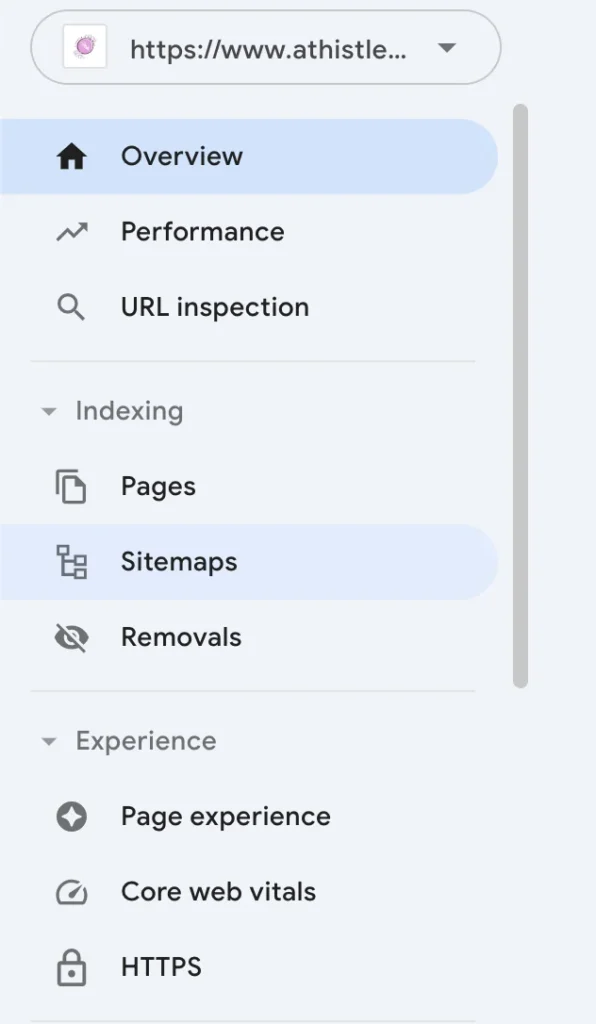
Anyway, if you open GSC, and look at the sidebar, you’ll find “Sitemaps” under the Indexing section:

When you click on it, you will see this page:

Again, if I had a sitemap, it should’ve appeared under “Submitted Sitemaps,” like this:

But it didn’t. Because I do not, in fact, have any sitemaps.
How to Create a Sitemap
So, as I trekked along this journey, I realised that I did not have a sitemap. Which is not good. And yes, at the very beginning of this blog, I said that I wanted to look at technical things I’d been ignoring. This is one of them. But this is a crucial thing to ignore.
And while I would not recommend making any huge changes to your website while a Google update is happening, I couldn’t sit back and wait for the update to pass before I submitted a sitemap.
So, for all intents and purposes, in this blog only, we’re going ahead with it. I’ll treat this as an experiment. A poorly thoughtout one, but an experiment. What happens if you make important site changes during a Google update?
Chances are, I won’t notice anything since my blog isn’t all that big, but I like data. So, I’m going to be creating and submitting a sitemap for my blog. Let’s goooo.
If you’re on WordPress, like I am, you can easily create a sitemap using plugins. The one I used is called XML Sitemap Generator for Google. To install this, simply go to “Add New Plugin” under the “Plugins” section of your WordPress Dashboard. Just type the plugin’s name in the search bar, and you will see this:

After you install and activate the plugin, it will automatically create the sitemap for you. Next, you’ll need to find its settings. Go to “Settings” in the sidebar and click on “XML-Sitemap.”
This page will look something like this:

It will have other sections too like “Additional Pages,” “Post Priority,” “Sitemap Content,” and others. But you didn’t need to make any changes. The default settings are pretty good. One change that I did make, however, was this:
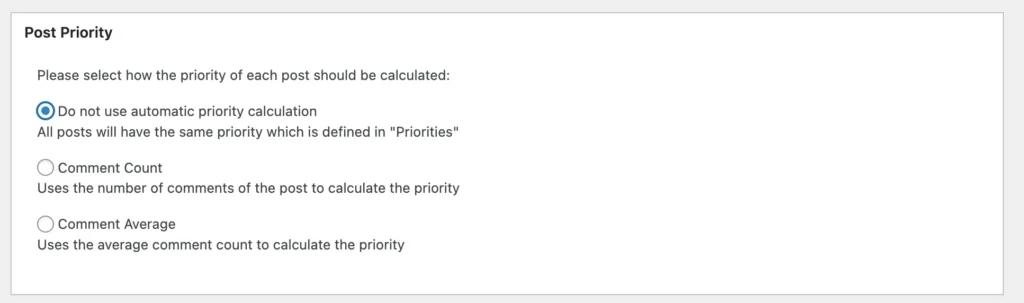
This is because I have comments turned on, and some of my older posts tend to get more comments compared to the newer ones. If you don’t have comments on your site, don’t worry about it.
If you do make changes like I did, scroll down to the bottom of the page and click “Update Options.”
To see your sitemap, enter “https://yoursite.com/sitemap.xml,” like I did in the manual check, on a new tab in your browser. Remember to replace “yoursite” with your domain name.
It should look like this:
Next up, you need to submit it to Google.
How to Submit Your Sitemap to Google (in Three Simple Steps!)
The process of submitting your sitemap is actually really, really simple (which is why I don’t understand why I hadn’t done this before). Here is a three-step guide on how you can do that.
Step 1: Log in to Google Search Console
If you haven’t already, log into or create your Google Search Console. I’ve already linked Google’s page on creating a GSC account, but if you skipped over to this section, visit this link here for directions on how to create your account. It’s completely free.
Step 2: Head to the Indexing Section in the Sidebar and Click on “Sitemaps”
As we did in the “How to Find Your Blog’s Sitemap” section, you’re going to go to “Sitemaps” under the “Indexing” section. This is where you’ll be able to manage and add new sitemaps.
Step 3: Find the Correct Sitemap URL and Add a New Sitemap
Now, once you’re in “Sitemaps,” add the last part of your sitemap URL to the “Add a new sitemap” section. Since my sitemap URL is “https://www.athistleinthewind.com/sitemap.xml,” I went in and added “sitemap.xml.”

And then all you have to do is click on “Submit.” Simply refresh your page and you should be able to see this:
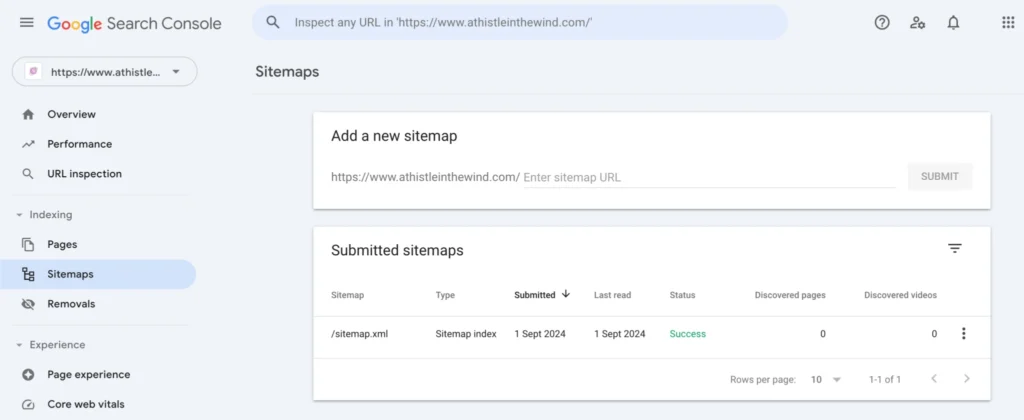
And that’s it! You’ve submitted your sitemap. All-in-all, this process shouldn’t take you more than a few minutes. In my case, since I’m writing while I created and submitted my sitemap, it took me a little over an hour. But it’s pretty straightforward.
Again, don’t be like me! Sitemaps are important.
Note: It can take Google anywhere from a few hours to up to a week to index a sitemap. At the time of this publication, my sitemap hadn’t been indexed. I’ll be making updates to this blog as I see results.Update: As of Sep 3, my blog has been indexed by Google:
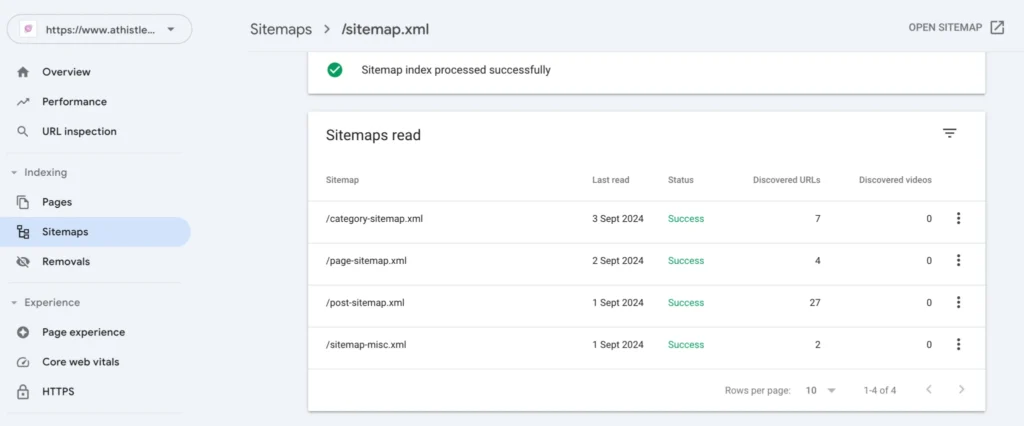
So, case in point: this works!


21 Comments
Beren
I didn’t know that sitemaps could be done without developers. I really liked the captions under the pictures though. Do tell us more:)
athistleinthewind
Haha, thank you Beren! I’ll have to see how it pans out before making any decisions related to the captions:D
Okley
This was a very well written article. Any ideas on how to leverage schema mark ups for better performance?
portia
very helpful!!!
Rumer
Hey!! Great, insightful article!
Ryan
Hi! Do you know if they make any plugins to help with SEO?I’m trying to get my site to rank for some targeted keywords but I’m not seeing very good success. If you know of any please share!
Ava
This was very informative. Thanks!
Sadiya
Just came across your blog! Great tips:D
Kon
A great read. I had my sitemap done by developers but it’s good to see that there are options available for small business owners!
Tim
Thanks for the tips!
Moll
very easy to follow!
Reyne Buffet
Thanks for helping me understand this:)
Ceren Arda
You really make it appear so easy along with your presentation but I find this matter to be actually something that I believe I might by no means understand. It kind of feels too complicated and extremely large for me. I am taking a look forward in your next post, I will try to get the hang of it!
Connie Tretter
I think the problem with Site Kit is that I feel like all my marketing efforts are not displayed it here accurately. What do you think? THere maybe some misalignment with my goals and what I am seeing…
Henna G.
I’ve been exploring for a little for any high quality articles or blog posts on this sort . Exploring in Yahoo I at last stumbled upon this website. Reading this information So i am happy to convey that I’ve a very good feeling I discovered just what I needed. I most certainly will make sure to do not forget this website and give it a look on a constant basis.
Heglander
Hey There. I found your weblog the use of msn. This is a very well written article. I will make sure to bookmark it and come back to learn more of your useful info. Thank you for the post. I will definitely return.
Christiane L.
Nice post. This wasn’t what I was searching for but I still enjoyed reading it.
Ken Davis
Hello There. I found your blog using msn. This is an extremely well written article. I’ll be sure to bookmark it and return to read more of your useful information. Thanks for the post. I’ll certainly return.
Charlotte Stinsil
Thanks for giving your instructions listed here.
Joel Webster
Excellent post from you, man. I’ve considered your stuff in the past and you’re simply too magnificent. I really like what you’ve got here, really like what you’re stating and the way during which you say it. You’re making writing and reading enjoyable. I cannot wait to read far more from you. This is actually a tremendous website!
Bill Warburton
Generally I do not read article on blogs, but I wish to say that this write-up very forced me to try and do it! Your writing style has been surprised me. Thanks, quite nice article.