How to Set Up Site Kit by Google in Your WordPress Dashboard

One of the SEO gurus I follow on Twitter, came out with a tweet today saying that the August Update might end some time this week. So, in order to finish this mini series on time, I decided to get ahead and finish off with a guide on Site Kit.
In my previous blog, I talked about how you can use Google Search Console to submit your sitemap. But that’s not all that GSC is used for. In fact, if you combine GSC with Analytics, you can get a pretty solid overview of things like web traffic and keyword tracking.
Side note: I’m going to write a blog on this particular subject later on this month, especially since I’m currently using these tools for keyword analysis at work. So, watch out for those blogs!In the meantime, I’ll help you set up Site Kit in your WordPress dashboard, so that you can see data from GSC and Analytics in one convenient spot.
A Brief Introduction to Site Kit
Site Kit by Google is a free, powerful WordPress plugin designed specifically to add essential Google services to your website. If you’re signed in to WordPress, you can easily click on Site Kit on the top of your page, and view valuable insights:

This is very, very convenient, and if you’re using Adsense, you can also see information on monetization, along with performance and traffic in a single place without clicking off your website.
Any WordPress user will tell you that it’s super tedious to have multiple plugins, that may or may not conflict with one another, and constantly require you to navigate between different dashboards.
Site Kit eliminates that, and you can get a consolidated view of your site’s health and performance, all in one dashboard.
Google Analytics and Search Console’s Role in Site Kit
If you’re a blogger, or in marketing in general, you’ll know just how important it is to have visitors to your website. But bringing visitors is hard. You need to strategize, to do research, to make sure your site’s performance is good so people can actually browse through it.
That’s exactly what Google Analytics and Search Console do for your website. Even if you’re not the most techie person out there, or you have no idea how these things work (I know this was me about five years ago), at the very least you can use these tools to see how many visitors are showing up on your website.
If you have a bit more experience, you’d be able to find out what page your visitors are visiting, and so on. Bottom line is, as you dig around Google Analytics, you’ll see that it’s got a treasure trove of knowledge relating to your site’s performance, your visitors’ behaviour, where your visitors are coming from, which you can use to specifically market your products and services to them.
Google Search Console, or GSC as I usually call it here, helps you monitor your website’s health which may be hindering your site’s potential. It can highlight indexing issues, critical content issues and more.
But a lot of new bloggers shy away from using Analytics and GSC. I didn’t even use Analytics and GSC for this site until I got shocked by the traffic coming in during this Google update.
And I think that’s a mistake. Not using Analytics and GSC, I mean.
Even if you’re a total newbie, you should install Site Kit in your WordPress dashboard. It’ll be an easy introduction to the more complicated aspects of the aforementioned tools.
A Step-by-Step Guide to Installing and Setting Up Site Kit
Hopefully, I’ve been able to convince you that installing Site Kit is the right move to help you monitor and grow your blog. In this section, I’m going to help you install and activate this plugin, so you can start seeing your site data in your dashboard.
1. Installing the Site Kit by Google Plugin
If you don’t know how to install a plugin on WordPress, don’t worry about it. This part of the tutorial should work for any plugin you’re interested in installing. There will be just one tweak you’d have to make.
So, what do you do?
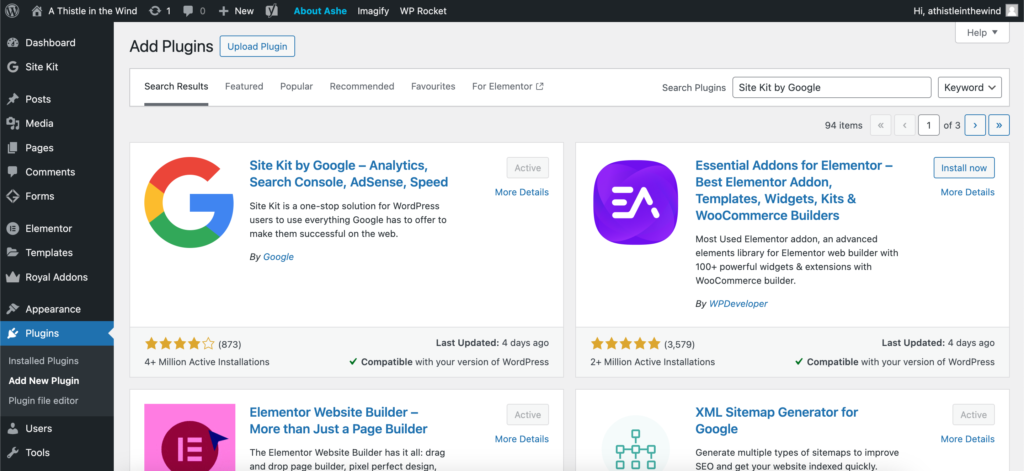
Well, you first need to log into your WordPress Dashboard. Then, you will need to go to “Plugins” in the side bar and choose “Add New Plugin.”
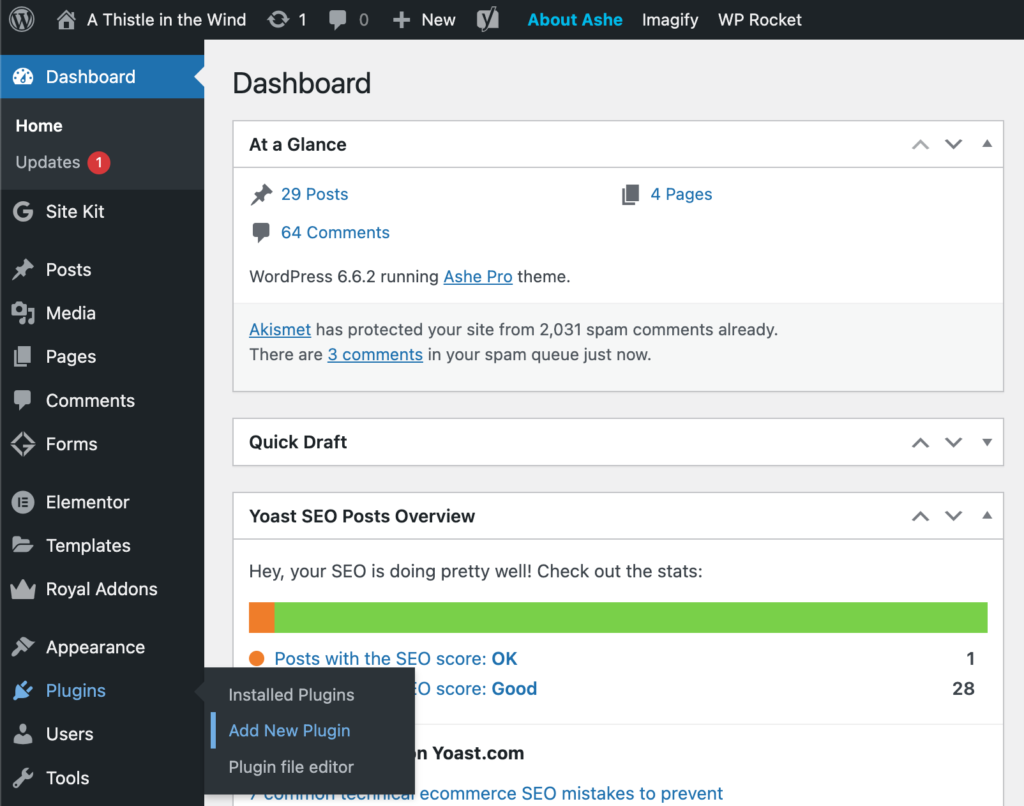
Type “Site Kit by Google” (for other plugins, just write their names instead) in the search bar on the right.
The plugin for Site Kit will have a button called “Install” next to it. Click it, and once the plugin has been installed, this button will say “Activate.” Click it once more and it will activate the plugin for your website.
2. Setting Up Site Kit by Google
Once the plugin has been activated, the page will show a success message banner and will ask you to start the set up. You need to click on this button.
You can also locate “Site Kit” on the side menu and click on “Dashboard.” This will take you to the page, prompting you to begin as well.
It doesn’t matter which method you use, what matters is that you click on “Start Setup.” When you do so, you will be taken to Site Kit’s setup page, where you’ll be prompted to sign in with Google.

You’ll have to allow Site Kit access to your Google account, and you can do so by clicking “Allow.” When you do this, in the next page, it will ask you to verify that you’re the owner of the website.
This is quite simple actually, just click “verify” and you’re done!
But that’s not all.
In the next page, you’ll need to allow your site to access your Google Account data. Click “Allow.”
And then, you’ll be asked to set up Google Search Console. Once again, click the button.
Now you’re done. Wasn’t that simple? Site Kit’s designed to be extremely easy to set up, and it works really well.
Click on “Go to my Dashboard” to return to WordPress.
When you’re back in WordPress, you will have to go to the Site Kit dashboard where you will see the following Google tools:
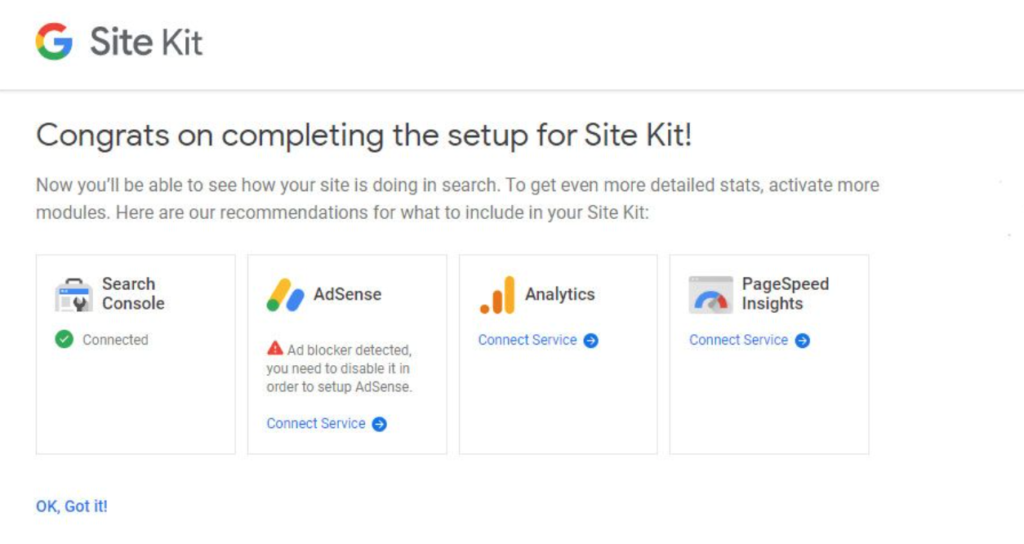
3. Configuring Site Kit Settings
To ensure that you get the best out of your Site Kit experience, you need to connect all Google Services listed. I don’t use AdSense, so I won’t be touching on that.
Connecting Google Analytics
Click on “Connect Service” under Analytics inside your Site Kit dashboard. Once again, you’ll be asked to log into your Google account, and you’ll have to allow Site Kit to access your account data. Once you click on “Allow,” you’ll be taken back to the dashboard.
This time, you’ll be asked to choose your Analytics account, property and view.
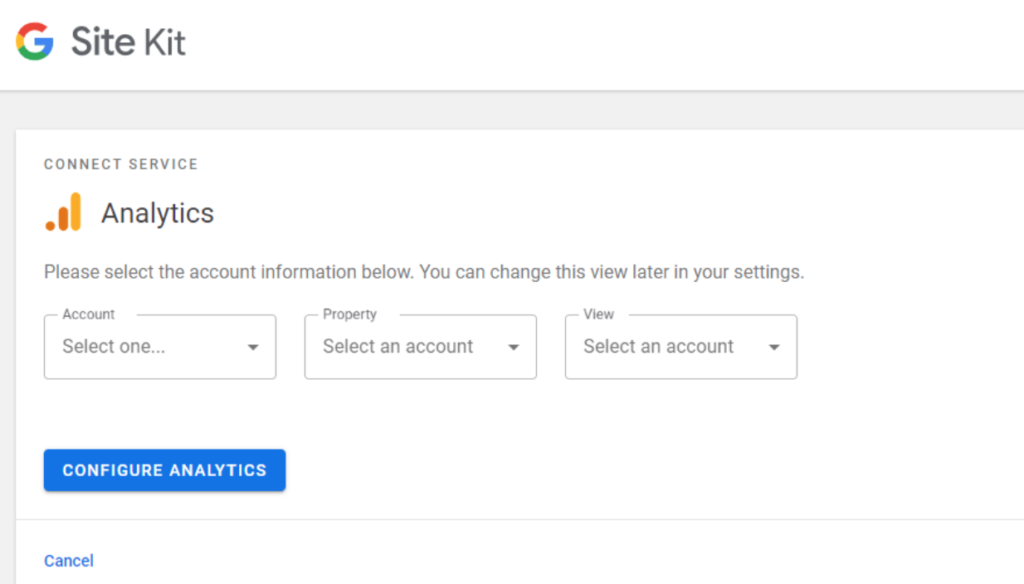
If you’re reading this guide, there’s a huge chance that you don’t have an Analytics account. But if you do, all you have to do is choose your account from the option in the dropdown menu.
Creating Your Google Analytics Account
I’m going to go off on a limb here and assume you need to create a new account. So, all you have to do is log in to Analytics and go to “Admin.” Then, you can will have to create a new account.
Next, you will name your account. Generally, you should probably name it after your blog. Make sure that all the default options have been checked. Then you can go down to the bottom of the page where you will click “Next.”
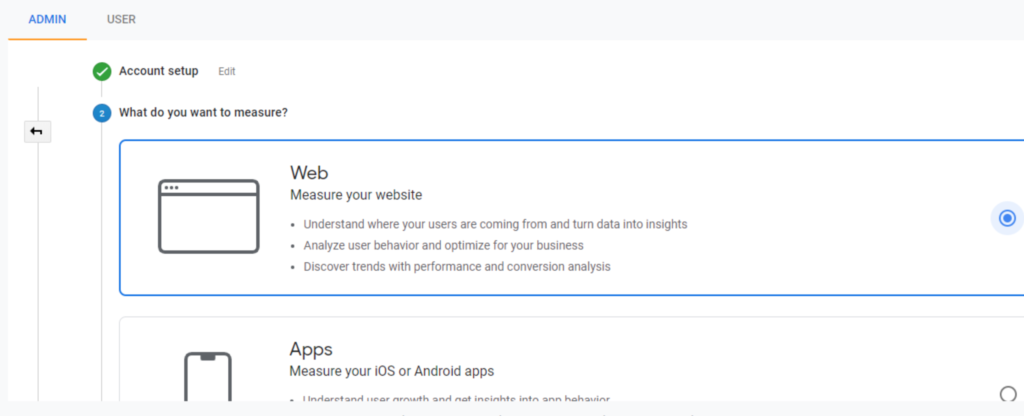
You will then be asked to choose what you want to measure. Since you’re trying to connect your website, choose “Web.” Then, you can click “Next” once more.
You’re going to be asked to set up your properties. I would suggest naming it after your blog once again. Don’t worry about your account name and property name being the same. You will have to add your site’s URL, choose your industry and the timezone. Then, you will have to click “Create.”
At this point, you’ll get the message to accept Google’s terms, and you will have to accept that to finish creating your Google Analytics account.
You will see the Analytics code, but don’t worry about that. Simply go back to Site Kit on your dashboard, and click “Analytics.” Then, choose your account and property from the dropdown menu. For view, you should choose “All Web Site Date.” Then, click on “Configure Analytics” to finish your setup.
Side note: it may take anywhere between a few minutes to days for you to see all your data, but there’s no need to worry about that. Especially if you’ve just set up Google Analytics. GA-4, as it also referred to, requires 24 to 48 hours to show the latest data.Connecting Google PageSpeed Insights
For PageSpeed Insights, simply go to “Settings” under Site Kit in the side bar and click “Setup PageSpeed Insights.” Wait for a few minutes, and that’s it!
Check If Everything’s Connected!
As a final step, just to make sure that everything’s connected, I would recommend that you go back to “Settings” under Site Kit and check if you can see this:
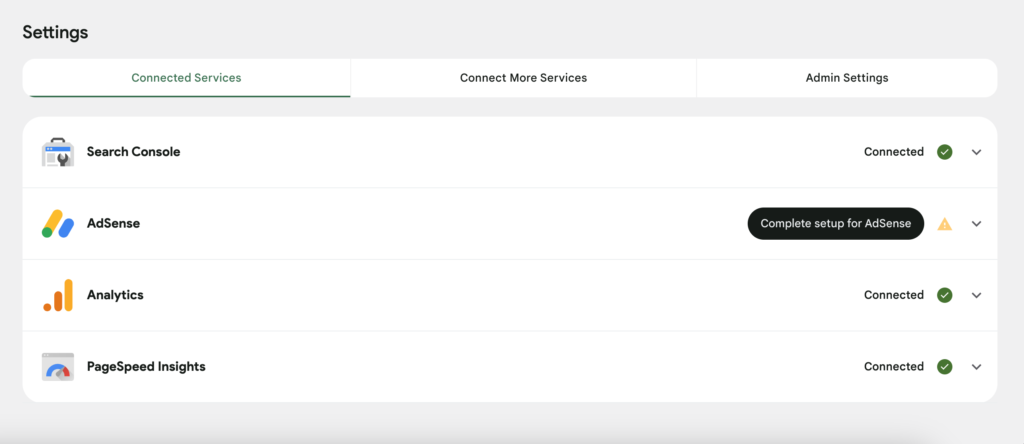
If all the Google Services you need are showing up as connected, you’re sorted!
You’ve set up Site Kit for your WordPress website. It’s a pretty simple, straight forward process and now you can see all that important site performance and tracking data right in your WordPress dashboard.
Pretty neat, right? Let me know what your experience with Site Kit has been like?


12 Comments
Patrick
Thanks for the tips! I used your post to set up Site Kit:)
Francis
I always thought I’d need a developer to help set up Google Analytics etc. Can you write a blog on doing that please? How do I know how to properly set up Google Analytics 4?
Amanda
Thanks for letting me know about this! I had no idea how easy this was!
Martin
I came across your Pinterest and I’m really happy that I landed on this page. I’ve been having problems with Google Analytics. I didn’t know you could do it through Site Kit. I was done in less than 10 mins! Many thanks!!!
Linda
Great info, this was so easy! I spent months trying to set up analytics, but this was great
George
Thanks!
Steven
Thanks for establishing the informing and fun platform!
Sammy
I’ve been struggling with Site Kit, but this post cleared everything up. Loved how simple and clear your explanations were!
Em
This tutorial was exactly what I needed! The screenshots were particularly helpful in ensuring I was on the right track. Thanks for sharing this valuable resource!
Steve
This was very well-written, Sura!
Armanda
How’s it going everybody? 😀
Morgan Reeves
I’m not a big fan of adding more plugins to my website but I think this one is important. Thanks for writing this!